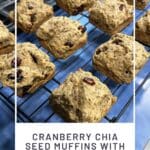
Cranberry Chia Seed Muffins with Tender Bakery Crumb
Make these cranberry chia seed muffins right at home. Your standard muffin recipe just got an upgrade. Greek yogurt and the right mixing technique create that pillowy texture you thought only bakeries could nail.
Servings: 12 muffins
Calories: 332kcal
As an Amazon Associate I earn from qualifying purchases.
Ingredients
- 2 Large Eggs
- 1 Cup Brown Sugar
- ½ Cups Greek Yogurt
- ½ Cup Milk
- ½ Cup Oil
- 2 Teaspoons Vanilla Extract
- 3 Cups All-Purpose Flour
- 3 Teaspoons Baking Powder
- ½ Teaspoon Baking Soda
- 2 Teaspoons Cinnamon
- ½ Teaspoon Salt
- 1 Cup Dried Cranberries
- 4 Tablespoons Chia Seeds
Instructions
- Preheat your oven to 375°F and either grease a 12-count muffin tin generously or line it with paper cups. Don't skip the grease even if you're using liners, it helps them release cleanly and get those crispy edges.
- In a medium bowl, whisk together the eggs and brown sugar until they're fully combined and the sugar starts to dissolve slightly. This takes about 30 seconds of vigorous whisking.2 Large Eggs, 1 Cup Brown Sugar
- Add the Greek yogurt, milk, oil, and vanilla extract, then whisk again until the mixture is smooth and uniform. The yogurt might look a little clumpy at first, but keep whisking and it'll come together.½ Cups Greek Yogurt, ½ Cup Milk, ½ Cup Oil, 2 Teaspoons Vanilla Extract
- Combine your dry ingredients in a separate large bowl: all-purpose flour, baking powder, baking soda, cinnamon, and salt. Whisk these together for a solid 20 seconds to make sure the leavening agents are evenly distributed. This step matters more than you think, clumps of baking powder create bitter pockets.3 Cups All-Purpose Flour, 3 Teaspoons Baking Powder, ½ Teaspoon Baking Soda, 2 Teaspoons Cinnamon, ½ Teaspoon Salt
- Pour the wet ingredients into the dry. Use a spatula or wooden spoon and fold gently, scraping from the bottom of the bowl up and over. Stop the second you stop seeing dry flour streaks. The batter should look lumpy and slightly rough. If it's smooth, you've already overmixed.
- Add the cranberries and chia seeds. Toss the cranberries and chia seeds on top of the batter, then fold them in with as few strokes as possible. You want to distribute them without crushing the berries or overworking the batter. Ten to fifteen gentle folds should do it.1 Cup Dried Cranberries, 4 Tablespoons Chia Seeds
- Divide the batter evenly. Use an ice cream scoop or a large spoon to portion the batter into the muffin tin. Fill each cup about three-quarters full. This gives them room to rise without spilling over.
- Bake for 15 to 20 minutes. Start checking at the 15-minute mark. The tops should be golden brown and spring back when you touch them lightly. A toothpick or cake tester inserted into the center should come out clean or with just a few moist crumbs, not wet batter.
- Let the muffins cool in the tin for about 5 minutes, then transfer them to a wire rack. If you leave them in the tin too long, they'll steam and get soggy on the bottom. Cooling them on a rack lets air circulate and keeps the texture right.
Notes
How to Know It's Done
The tops should be a deep golden brown, not pale yellow. Pale muffins are underbaked and will collapse as they cool. Press the top of a muffin gently with your finger, it should bounce back and feel firm, not squishy or wet. If your finger leaves an indent, they need a few more minutes. The edges will start to pull away from the sides of the tin slightly, creating a tiny gap. That's your visual cue that the structure has set. Smell is your secret weapon. When the muffins are done, your kitchen will smell like warm cinnamon and caramelized sugar with a hint of vanilla. If you're not smelling much yet, they're not ready. The toothpick test is solid, but don't wait for it to come out bone dry. A few moist crumbs clinging to the tester means the inside is perfectly tender. If it comes out wet with batter, give them another 3 to 5 minutes and check again. Internal temperature is the most accurate test if you want to get technical. Fully baked muffins hit around 200 to 205°F in the center. Anything below that and the structure hasn't fully set, which means they'll sink or turn gummy. Once they pass all these checks, pull them out and let them cool properly.Nutrition
Calories: 332kcal | Carbohydrates: 53g | Protein: 5g | Fat: 11g | Saturated Fat: 1g | Polyunsaturated Fat: 4g | Monounsaturated Fat: 6g | Trans Fat: 0.04g | Cholesterol: 2mg | Sodium: 180mg | Potassium: 112mg | Fiber: 3g | Sugar: 26g | Vitamin A: 21IU | Vitamin C: 0.1mg | Calcium: 131mg | Iron: 2mg