Last updated on November 2nd, 2025 at 04:33 pm
An important survival skill is to knowing how to build a shelter. When the weather turns, the right shelter can make the difference between comfort and real danger. On the homestead, it might mean preparing a storm shelter. In the backwoods, it might be a lean-to for the night. And for kids, it can even be a fun way to learn survival basics with a backyard project.
Protection from the Elements
When you’re in a survival situation, building a reliable shelter quickly becomes one of the most important priorities. A good shelter protects you from the elements, helps keep you warm, and can even provide a sense of security against wildlife. Focusing on essentials like location, insulation, and the materials you have on hand can make the difference between a shelter that barely works and one that truly keeps you safe.
There are many different styles of emergency shelters, but the fundamentals rarely change. You’ll always need to factor in your surroundings, the natural resources available, and how much time you have to build. Keeping these points in mind makes it easier to decide which type of shelter will work best for your situation.
Let’s explore simple ways to build a shelter that protects against rain, wind, and cold, using both natural materials and gear you already have on hand.
Why Shelter Matters
Shelter is one of the “big three” survival needs, right after water and fire. Without protection from the elements, exposure can set in fast. Sometimes in just a few hours in harsh conditions. A good shelter helps you:
- Stay dry in storms
- Block wind and conserve body heat
- Sleep more comfortably in the great outdoors
- Create a safe space for kids or family during emergencies
QUICK LOOK: Tips for Emergency Survival Shelters
- Choose Your Location. Pick a dry area protected from strong winds. Natural features like fallen trees, rock outcroppings, or hillsides can provide extra support.
- Clear the Area. Remove sharp sticks, rocks, or other debris to create a safe, comfortable sleeping surface.
- Gather Materials. Use what’s on hand like branches, leaves, moss, and rocks. If you’ve packed gear like a tarp or emergency blanket, keep it accessible.
- Establish a Framework. Start with sturdy branches to create a frame. A lean-to or debris hut works best when the base is solid enough to support layers.
- Insulate the Shelter. Pile on natural materials like leaves, grass, and pine boughs to trap heat. This step is key to staying warm in cold weather.
- Secure the Shelter. Check stability. Use rope, paracord, or even vines to lash sections together if needed.
- Test and Adjust. Get inside, see how it feels, and make adjustments. Adding insulation or patching wind gaps can make a big difference.
The Importance of Ventilation
Ventilation is a vital part of any emergency shelter, especially if you plan to use fire. Without proper airflow, you risk smoke inhalation, carbon monoxide buildup, or even suffocation.
Here’s what to keep in mind:
- Fresh air matters. Even a small vent or gap in the roof or entrance helps prevent stale air from building up.
- Always leave a vent or opening. Even in cold weather, make sure your shelter has a small gap for fresh air. A small hole near the roof or leaving part of the entrance slightly open can help.
- Use fire cautiously. If you’re building a fire inside or at the mouth of a shelter, keep flames low and always have an opening above or to the side for smoke to escape. Smoke and carbon monoxide can collect inside shelters with poor ventilation. Always create an outlet above the fire or to the side for fumes to escape.
- Avoid enclosed fires in snow shelters: Snow caves or quinzees can trap carbon monoxide. If you must use a small candle or stove. Cut a small hole in the roof for ventilation. This reduces the risk of suffocation and carbon monoxide buildup.
- Balance warmth and airflow. Too much ventilation means losing heat, but too little makes the air unsafe. Adjust the size of your vent based on fire use and outside temperature.
Keeping ventilation in mind ensures that your shelter not only protects you from the elements, but also keeps the air inside safe to breathe.
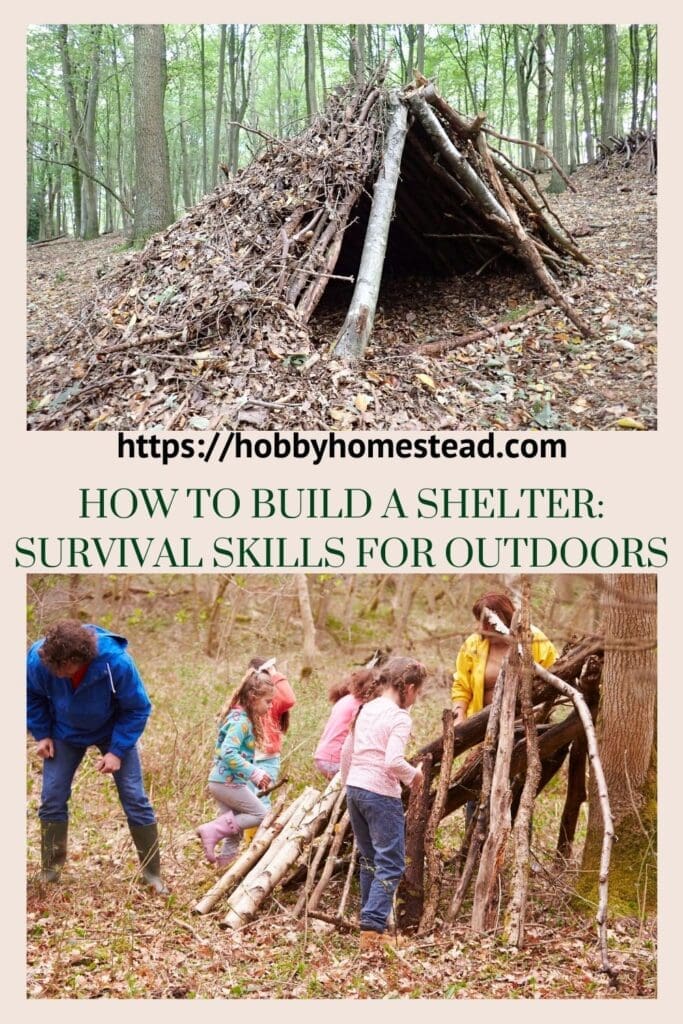
How to Build a Shelter: Survival Skills for Outdoors
We’ll cover the basics of how to build a shelter using four different methods and what to do for shelter in the winter.
Option 1: The Simple Lean-To
The lean-to is one of the easiest wilderness shelters you can build.
What you need:
- A sturdy ridgepole (long, strong branch or small tree)
- Smaller sticks or branches
- Leaves, pine boughs, or a tarp
Steps:
- Find two trees about 6–8 feet apart.
- Lay your ridgepole between them, securing it in place.
- Lean smaller sticks against the ridgepole to form a slanted roof.
- Cover with leaves, branches, or a tarp to block wind and rain.
- Add more layers for insulation if it’s cold.
This design is great for quick shelter in wilderness areas, but also doubles as a backyard survival lesson for kids.
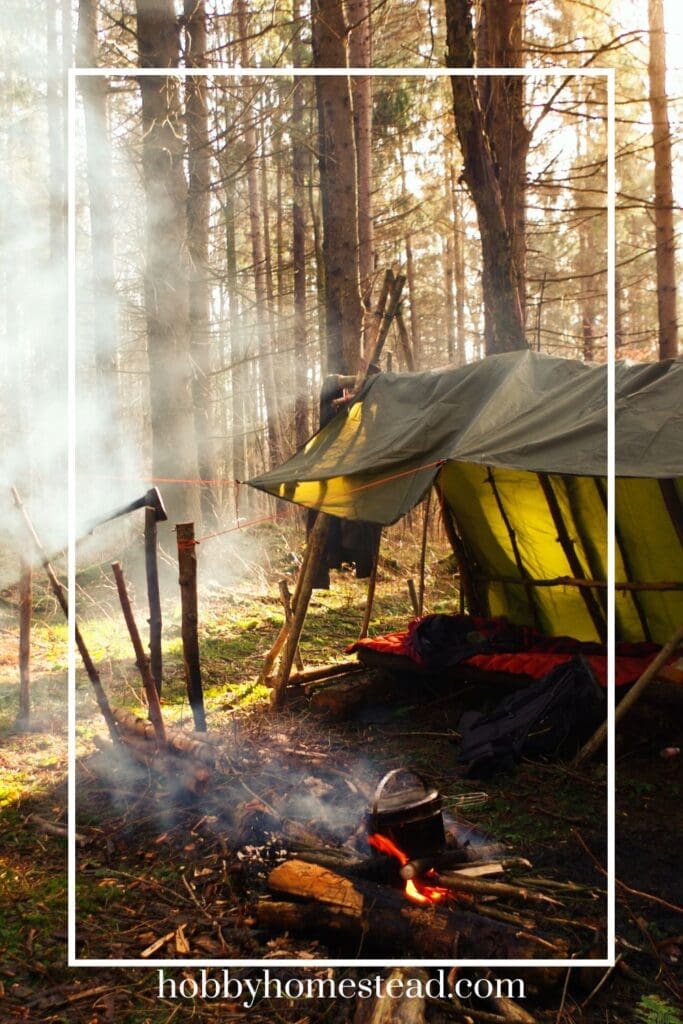
Option 2: Using a Tarp
A tarp is lightweight, packable, and one of the best ways to make an emergency shelter.
Classic tarp setup:
- Tie a rope between two trees to make a ridgeline.
- Throw the tarp over the line.
- Stake or weigh down the sides to form a tent shape.
Other tarp options include the A-frame, the diamond fly, or even a simple flat cover. Practice setting these up at home before you need them in the field.
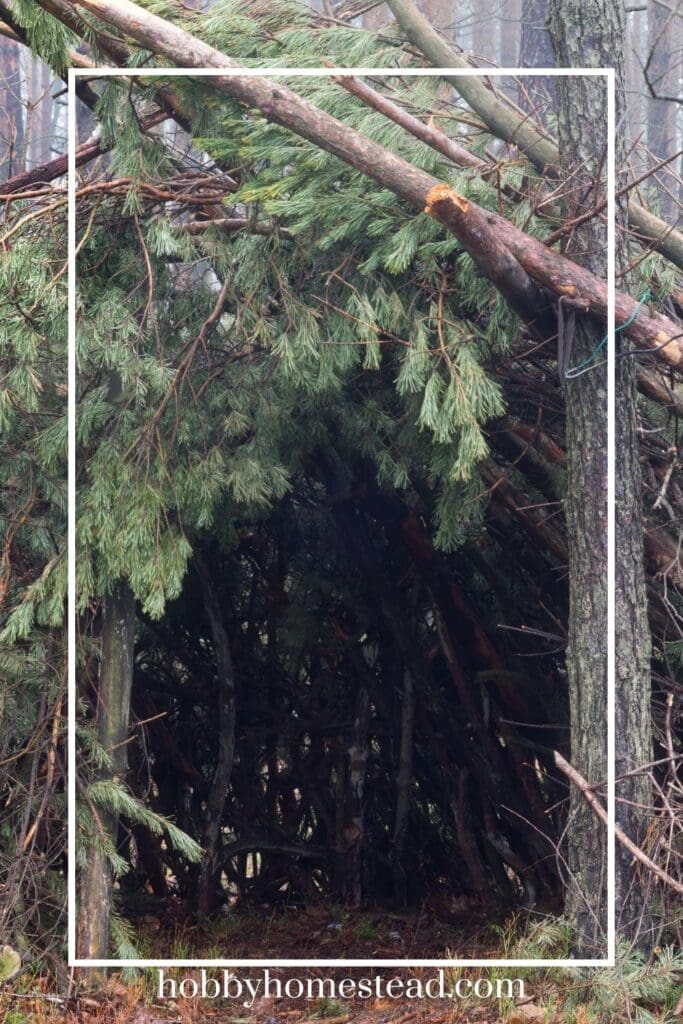
Option 3: Natural Debris Shelter
If you don’t have gear, nature provides.
Steps:
- Find a sturdy tree trunk or downed log.
- Lean branches against it to create a “tepee” or angled wall.
- Pile on leaves, moss, and pine boughs until it’s thick.
- Crawl inside and add more insulation until wind and water are blocked.
This type of shelter works well in an emergency, though it’s not as quick as a tarp setup.
Option 4: Homestead Storm Shelter
For those thinking long-term, a storm shelter or bug-out cabin is worth considering.
- Storm shelters can be dug into the ground or built into a basement, reinforced against high winds and tornadoes.
- Bug-out cabins are small, off-grid structures tucked into wooded areas for backup living.
Both take more planning but give you a secure fallback for major emergencies.
Building Emergency Shelters in Winter Conditions
Snow and cold temperatures bring new challenges to survival. The goal in winter is to stay dry, insulated, and out of the wind. Here are some shelter ideas for snowy conditions:
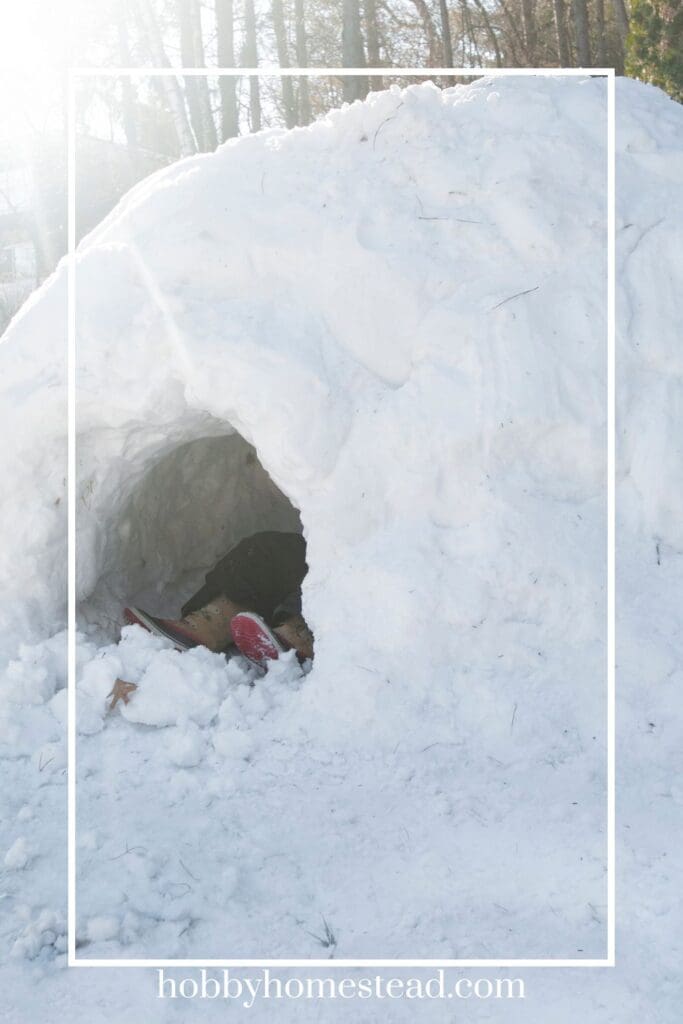
1. Snow Cave or Quinzee
- Snow caves are dug into deep snowbanks. They trap body heat surprisingly well.
- A quinzee is built by piling snow into a mound, letting it settle, and then hollowing it out.
- Always make a ventilation hole in the roof to prevent suffocation.
2. Tree Well Shelter
- In heavy snow, the space around the trunk of a large evergreen (like spruce or pine) can be used.
- Dig out the snow beneath the branches and use the natural canopy for cover.
- Add boughs or tarps for insulation.
3. Insulated Lean-To with Snow
- Build a lean-to frame from branches.
- Pack snow against the outside walls for insulation.
- Use evergreen boughs or a tarp to cover the roof.
4. Ground Insulation
- In winter, the ground will sap body heat quickly.
- Lay down layers of pine boughs, dry leaves, or even folded clothing to create a barrier.
- A sleeping pad or emergency blanket makes a big difference if you have one.
Key Winter Shelter Tips
- Try and avoid sweating while building. Moisture in your clothes can freeze and cause hypothermia.
- Keep entrances small to hold in heat. Make sure there’s enough airflow to avoid carbon dioxide buildup.
- Use snow as insulation. Even though it’s cold, packed snow traps heat better than open air.
- Build before dark. Constructing a shelter in daylight is much easier and safer than after the sun sets.
Wild Animal Considerations
When building an emergency shelter, remember that you’re not the only one living in the great outdoors. Wildlife may be curious, searching for food, or using the same natural features you want for shelter.
- Choose Your Location Wisely. Avoid setting up near game trails, watering holes, or berry patches. These are high-traffic areas for animals.
- Keep Food Away. Never store food inside your shelter. Use a bear bag or hang food from a tree at least 10 feet off the ground and 4 feet from the trunk.
- Stay Alert for Signs. Tracks, scat, or claw marks on trees may mean you’re in another creature’s territory. Move a safe distance away if you spot them.
- Use Barriers if Possible. A ring of rocks, brush, or even placing your shelter slightly elevated can discourage smaller critters from crawling in.
- Noise and Smell. Fires and human scent usually keep animals away, but in some areas (like bear country), food odors can attract them instead. Be cautious.
Your shelter should keep you safe not only from the weather, but also from unwanted animal encounters. Paying attention to your surroundings and storing food properly can make the difference between a restful night and a dangerous situation.
Shelter-Building Tips
- Choose your site wisely. High ground stays drier than low spots that collect water.
- Face openings away from the wind for warmth and protection.
- Insulate from the ground with leaves, pine needles, or even a spare blanket to keep body heat from draining into the earth.
- Practice ahead of time. Build a tarp shelter on a sunny day. Or let the kids try a lean-to with backyard sticks.
Challenges and Considerations When Building Emergency Shelters
Building an emergency shelter isn’t always straightforward. Even simple lean-tos or tarp setups come with their own challenges. Here are some common issues to think about before and during construction:
- Time and Energy. The more complex the shelter, the more energy it requires to build. In a survival situation, you may need something quick and simple to conserve strength.
- Weather Conditions. Rain, snow, or high winds can limit your options. A lightweight tarp may collapse under heavy snow, while a debris hut might not hold up well in constant rain.
- Material Availability. In dense forests, branches and leaves are plentiful. In open areas, you may need to rely on a tarp, poncho, or even digging into the ground.
- Insulation. Even the sturdiest shelter won’t keep you warm without insulation. Always think about adding layers between you and the cold ground, as well as on your shelter walls.
- Ventilation. Airflow is often forgotten but critically important.
Essential Tools and Materials for Building Emergency Shelters
While natural materials form the foundation of most survival shelters, having a few essential tools on hand can make the process much faster and more reliable. Over time, I’ve found that keeping a small survival kit with key items brings real peace of mind.
- Tarp or Emergency Blanket. Lightweight, packable, and versatile. A tarp can serve as a roof, a ground cover, or an extra layer against rain and wind. Emergency blankets also reflect heat back inside your shelter.
- Rope or Paracord. Strong cordage makes it easy to tie frameworks together, secure tarps, or reinforce walls. Even a short length of paracord can prevent a shelter from collapsing in strong winds.
- Cutting Tool. A good knife or multi-tool is one of the most valuable items in any survival kit. It allows you to cut branches, shape poles, trim cord, and prepare insulation materials quickly and safely.
- Basic Ground Cover. Natural insulation like pine boughs, leaves, or grass keeps you warmer by creating a barrier between your body and the cold ground. I often gather these while collecting firewood so they’re ready when it’s time to build.
- Portable Fire Starter. In cold conditions, being able to start a fire can mean the difference between a miserable night and a safe, warm one. Waterproof matches, a ferro rod, or a lighter should always be included in your pack.
When planning your survival kit, consider the local terrain and climate. The tools you need in snowy forests might be different from those in dry desert areas. These essentials not only make shelter building easier, but they also add an extra layer of security when emergencies arise.
Shelter Building Survival Skills
Shelter building doesn’t have to be complicated. From a quick tarp lean-to in the wilderness to a permanent storm shelter at home, each option gives you peace of mind when the unexpected happens. The best way to be ready is to practice before you need it.
Because when the wind howls and the rain pours, knowing how to build even the simplest shelter might just keep your family safe and comfortable.