Last updated on October 23rd, 2024 at 08:44 pm
Wondering how to start Composting? It’s a natural process that transforms organic waste into nutrient-rich soil. By composting, you can reduce your household food waste, enrich your garden soil, and contribute to a healthier environment. This guide will walk you through the basics of composting, from understanding what it is to harvesting your finished compost.
Quick Summary
An easy way to start the composting process, choose a convenient, well-drained spot in your yard for a compost bin or pile. Gather a mix of “greens” (fruit and vegetable scraps, coffee grounds, grass clippings) and “browns” (dry leaves, straw, cardboard, paper).
Begin with a layer of browns, then alternate with greens to balance carbon and nitrogen. Keep the compost moist like a damp sponge, adding water if too dry or more browns if too wet. Turn the compost regularly to aerate and speed up decomposition. Be patient, as composting can take a few months to a year. Once your compost is dark, crumbly, and earthy-smelling, it’s ready to use in garden beds, as mulch, or in potting soil.
We started with this simple method. However, there are other methods that work too such as worm composting, which helps speed up and decomposition process. Find more about other methods below.
Table of contents
What is Composting?
Composting is the process of breaking down organic materials, such as kitchen scraps and yard waste, into a dark, crumbly substance known as compost. This process is driven by microorganisms, such as bacteria and fungi, which decompose the organic matter. The result is a nutrient-rich soil amendment that can improve soil structure, enhance water retention, and provide essential nutrients to plants.
Why Compost?
Environmental Benefits:
- Reduces landfill waste: Composting diverts organic waste from landfills, reducing methane emissions and conserving landfill space.
- Enriches soil: Compost improves soil health by adding organic matter, which enhances soil structure and fertility.
Personal Benefits:
- Cost savings: By composting, you can reduce the need for chemical fertilizers and soil amendments.
- Healthier plants: Compost provides a slow-release source of nutrients, promoting healthier and more resilient plants.
Types of Composting
Cold Composting:
- Simple and low-maintenance.
- Involves piling up organic materials and letting them decompose naturally over time.
Hot Composting:
- Faster process that requires more effort.
- Involves maintaining specific conditions (temperature, moisture, aeration) to speed up decomposition.
Vermicomposting:
- Uses worms (typically red wigglers) to break down organic material.
- Ideal for small spaces and indoor composting.
Getting Started
Choosing a Composting Method:
- Consider factors such as space, time, and effort when selecting a composting method.
- Cold composting is great for those with limited time, while hot composting is suitable for those who want faster results.
Selecting a Compost Bin:
- Tumblers: Easy to turn and manage, ideal for hot composting.
- Stationary bins: Simple and affordable, suitable for cold composting.
- DIY options: Build your own bin using materials like wood pallets or wire mesh.
What to Compost
Green Materials:
- Kitchen scraps (fruit and vegetable peels, coffee grounds).
- Grass clippings and garden waste.
Brown Materials:
- Leaves, straw, and cardboard.
- Paper products (newspaper, paper towels).
What Not to Compost
- Meat, dairy, and oily foods (attract pests and create odors).
- Diseased plants and weeds with seeds (can spread diseases and weeds).
- Avoid Dairy Products: It’s best to avoid composting dairy products like milk, cheese, and yogurt. These items can attract pests and create unpleasant odors, which can disrupt the composting process.
- Some Tea Bags: Tea bags can be composted, but it’s important to check the materials used in the bags. Many tea bags contain plastic, which won’t break down in compost and can introduce microplastics into your soil¹². Look for tea bags made from natural fibers or opt for loose-leaf tea to ensure only compostable materials are added to your bin².
Setting Up Your Compost Pile
Location:
- Choose a well-drained spot with good air circulation for the compost heap.
- Consider convenience and accessibility.
Layering:
- Alternate layers of green and brown materials.
- Aim for a ratio of roughly 2:1 browns to greens.
Moisture and Aeration:
- Keep the pile moist, like a wrung-out sponge.
- Turn the pile regularly to provide oxygen and speed up decomposition.
Maintaining Your Compost
Turning the Pile:
- Turn the pile every 1-2 weeks to aerate and mix materials.
- This helps maintain the right temperature and speeds up decomposition.
Monitoring:
- Check the temperature: A hot pile (130-160°F) indicates active decomposition.
- Monitor moisture: Add water if too dry, add browns if too wet.
Troubleshooting:
- Bad odor: Usually caused by too much green material or lack of aeration. Add browns and turn the pile.
- Pests: Avoid adding meat and dairy, and cover food scraps with browns.
Make a Worm Bin for Worm Composting
Creating a worm bin for vermicomposting is a straightforward and rewarding project. Here’s a step-by-step guide to help you get started:
Materials Needed
- Two plastic bins with lids (dark-colored, around 10 gallons each)
- Drill with 1/4-inch and 1/8-inch drill bits
- Shredded newspaper or cardboard
- Spray bottle with water
- Red wiggler worms (about 1,000 worms)
Steps to Make a Worm Bin
Drilling Air Holes:
Drill 1/4-inch holes around the top edge of one bin for ventilation.
Drill 1/8-inch holes in the bottom of the same bin for drainage.
Prepare the Bedding:
Fill the bin with shredded newspaper or cardboard, about 2-3 inches deep.
Moisten the bedding with water from the spray bottle until it’s damp but not soaking wet.
Add the Worms:
Gently place the red wiggler worms on top of the bedding.
Let them burrow into the bedding on their own.
Feeding the Worms:
Add small amounts of kitchen scraps (fruit and vegetable peels, coffee grounds) to the bin.
Bury the food scraps under the bedding to prevent odors and pests.
Maintain the Bin:
Keep the bin in a cool, dark place, ideally between 50-75°F.
Monitor the moisture level, adding water if the bedding dries out.
Turn the bedding occasionally to aerate and mix the materials.
Harvesting the Compost:
After a few months, the bedding will be transformed into rich, dark compost.
Separate the worms from the compost by moving the contents to one side of the bin and adding fresh bedding and food to the other side. The worms will migrate to the new food, making it easier to collect the finished compost.
Tips for Success
- Avoid adding meat, dairy, and oily foods to the bin, as they can attract pests and create odors.
- If the bin starts to smell, it may be too wet or have too much food. Adjust by adding more dry bedding or reducing the amount of food.
Ways Speed up Decomposition and Creation of Soil
We are still in the early stages of creating our composting area. We’re trying to find the right balance of ingredients.
To help decomposition in your compost pile, you should focus on maintaining a good balance of carbon-rich (“browns”) and nitrogen-rich (“greens”) materials, along with proper moisture and aeration. Here are some key additions and tips:
Carbon-Rich Material. Think brown colors such as:
- Dry leaves
- Straw
- Cardboard and paper
- Wood chips and small branches. Adding wood chips can be beneficial as they provide structure and help with aeration, but they decompose slowly.
Nitrogen-Rich Materials. Think green colors like:
- Fruit and vegetable scraps
- Coffee grounds
- Grass clippings
- Manure animals like cows, horses, and chickens.
Moisture. Keep the compost pile as moist as a damp sponge. Add water if it’s too dry and add more browns if it’s too wet.
Aeration. Turn the compost regularly to introduce oxygen, which helps speed up the decomposition process.
Compost Activators. You can add compost activators like finished compost, garden soil, or commercial compost starters to introduce beneficial microorganisms.
It’s best to use them in moderation and mix them with other browns and greens to maintain a balanced compost pile.

Indoor Composting
Indoor composting is a great way to recycle kitchen scraps and create nutrient-rich compost for your plants, even if you don’t have outdoor space. Here are a few methods to get you started:
Vermicomposting (Worm Composting)
Materials Needed:
- A worm bin (you can buy one or make your own)
- Red wiggler worms
- Bedding material (shredded newspaper, cardboard)
- Kitchen scraps (fruit and vegetable peels, coffee grounds)
Steps:
1. Set up your worm bin with bedding material.
2. Add the worms and let them settle in.
3. Bury kitchen scraps under the bedding.
4. Keep the bin moist and in a cool, dark place.
5. Harvest the worm castings (compost) after a few months.
Bokashi Composting
Materials Needed:
- Bokashi bucket with a tight-fitting lid
- Bokashi bran (inoculated with beneficial microbes)
- Kitchen scraps (including meat and dairy)
Steps:
1. Add kitchen scraps to the Bokashi bucket.
2. Sprinkle Bokashi bran over the scraps.
3. Press down to remove air and close the lid tightly.
4. Repeat until the bucket is full.
5. Let it ferment for 2 weeks, then bury the contents in soil to complete decomposition.
Indoor Compost Bin
Materials Needed:
- A lidded plastic bin or container
- Drill (for making air holes)
- Shredded newspaper or cardboard
- Kitchen scraps
Steps:
1. Drill holes in the bottom and sides of the bin for drainage and aeration.
2. Add a layer of shredded newspaper or cardboard.
3. Add kitchen scraps and cover with more newspaper.
4. Keep the bin moist and turn it occasionally.
5. Harvest the compost when it’s dark and crumbly.
Tips for Success
Balance Greens and Browns: Maintain a good mix of nitrogen-rich greens (kitchen scraps) and carbon-rich browns (paper, cardboard).
Avoid Odors: Bury food scraps under bedding and avoid adding meat, dairy, and oily foods (except in Bokashi composting).
Monitor Moisture: Keep the compost moist but not soggy.
Indoor composting can be a convenient and effective way to manage kitchen waste and produce valuable compost for your plants. Would you like more details on any of these methods or tips on troubleshooting common issues?
Harvesting Your Compost
When is it Ready?
Finished compost is dark, crumbly, and has an earthy smell. It should no longer resemble the original materials.
How to Use Compost:
Mix into garden soil to improve fertility and structure. Use as mulch to retain moisture and suppress weeds. Add to potting soil for container plants.
Composting is a great way to benefit both your garden and the environment. By following these steps, you can reuse your kitchen waste and start your composting journey.
Make a Worm Bin for Worm Composting
As an Amazon Associate I earn from qualifying purchases.
Equipment


Materials
- Two plastic bins with lids dark-colored, around 10 gallons each
- Drill with 1/4-inch and 1/8-inch drill bits
- Shredded newspaper or cardboard
- Spray bottle with water
- Red wiggler worms about 1,000 worms
Instructions
Steps to Make a Worm Bin
Drill Air Holes:
- Drill 1/4-inch holes around the top edge of one bin for ventilation.
- Drill 1/8-inch holes in the bottom of the same bin for drainage.
Prepare the Bedding:
- Fill the bin with shredded newspaper or cardboard, about 2-3 inches deep.
- Moisten the bedding with water from the spray bottle until it’s damp but not soaking wet.
Add the Worms:
- Gently place the red wiggler worms on top of the bedding.
- Let them burrow into the bedding on their own.
- Feeding the Worms:
- Add small amounts of kitchen scraps (fruit and vegetable peels, coffee grounds) to the bin.
- Bury the food scraps under the bedding to prevent odors and pests.
Maintain the Bin:
- Keep the bin in a cool, dark place, ideally between 50-75°F.
- Monitor the moisture level, adding water if the bedding dries out.
- Turn the bedding occasionally to aerate and mix the materials.
Harvesting the Compost:
- After a few months, the bedding will be transformed into rich, dark compost.
- Separate the worms from the compost by moving the contents to one side of the bin and adding fresh bedding and food to the other side. The worms will migrate to the new food, making it easier to collect the finished compost.
Notes
Tips for Success
Avoid adding meat, dairy, and oily foods to the bin, as they can attract pests and create odors. If the bin starts to smell, it may be too wet or have too much food. Adjust by adding more dry bedding or reducing the amount of food.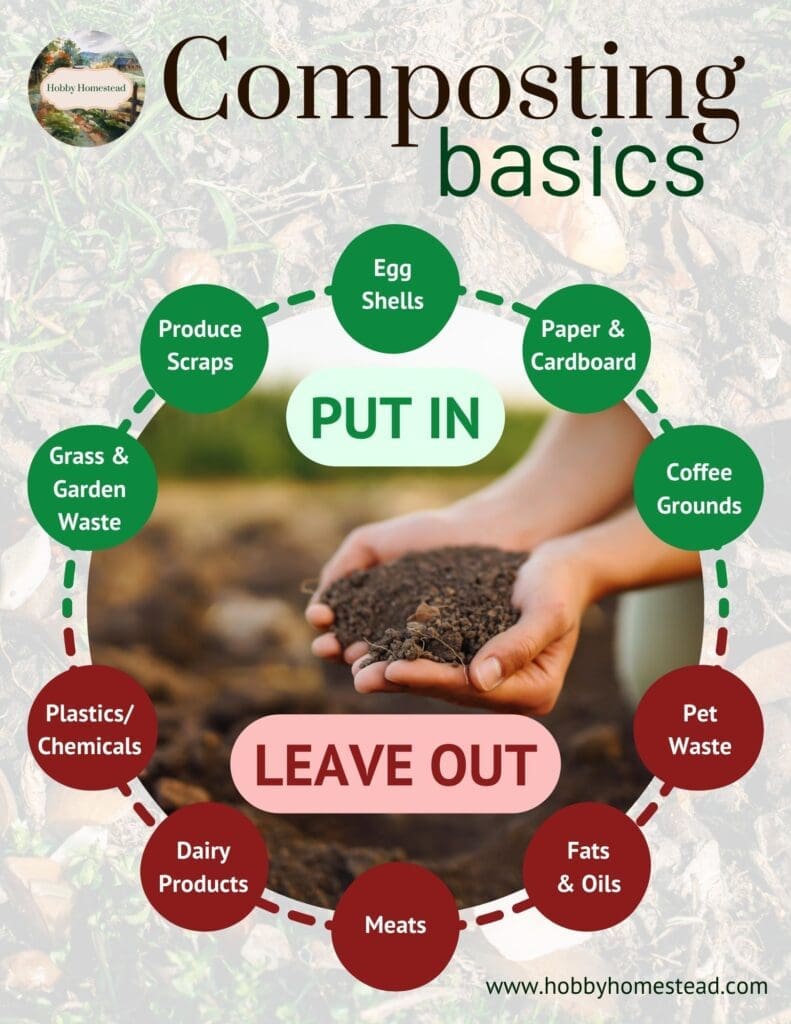
References
Beginner’s Guide To Indoor Composting Without Worms.


Thank you for sharing this information.
Thanks for sharing the details.