These browned butter sourdough granola bars are that something. They’re chewy without being gummy, hold together when you bite into them, and have this deep, nutty complexity that makes people ask what’s in them.
Turn sourdough discard into chewy granola bars with browned butter, honey, oats, and your favorite mix-ins. These bars hold together perfectly, last two weeks in the fridge, and taste better than store-bought. Includes tips for perfect browning, pressing techniques, and creative variations.
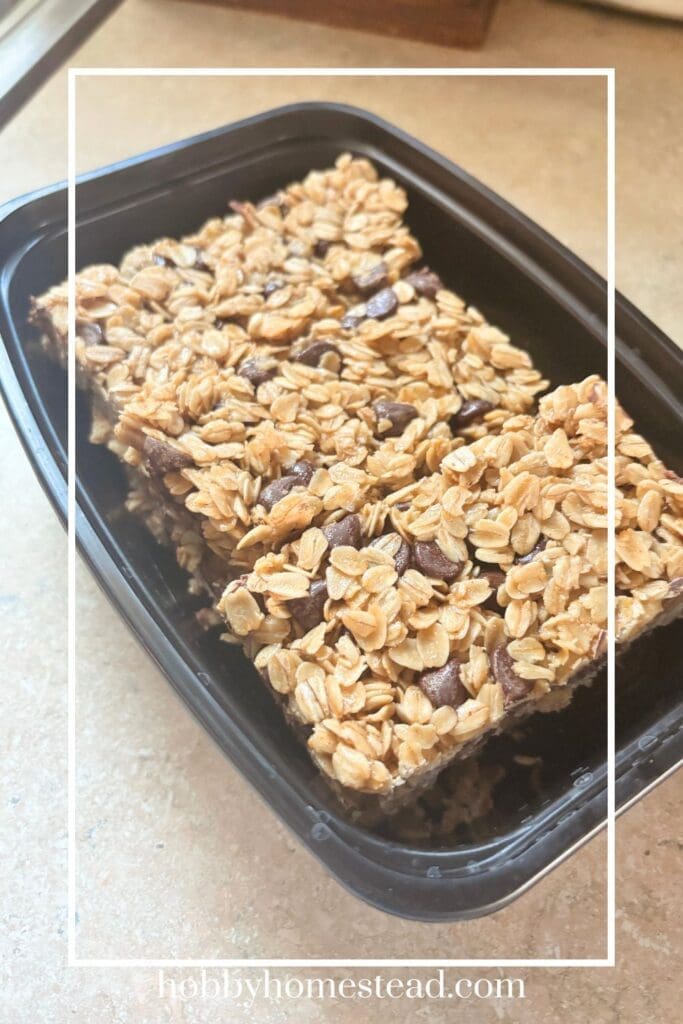
Lunch Box Treat
Some recipes are more than words on a note card. As I tuck a couple of these Browned Butter Sourdough Granola Bars into my husband’s lunch box, I’m reminded that the best fuel isn’t always just about nutrition, but about the care that goes into it.
The deep, toasty aroma of browned butter mixed with that familiar sourdough tang has turned his midday break into something he actually looks forward to. While his work day gets busy, these bars stay perfectly chewy and satisfying, a little piece of home that holds up until the very last bite.
They’ve graduated from a simple way to use up sourdough discard to a non-negotiable staple in his daily bag. These bars show that it takes but a few humble ingredients to make the quiet moments of everyday life the most meaningful.
Sourdough Discard Recipe
You know that feeling when you open the fridge and spot that jar of sourdough discard staring back at you?
The one that’s been sitting there for three days because you already made crackers twice this week and you’re out of ideas. You need something different, something that doesn’t scream “I’m using up my starter again.”
That jar of sourdough discard just became your secret weapon.
These bars are:
- Chewy without being gummy
- Packed with nutty browned butter flavor
- Totally customizable with your favorite mix-ins
- Firm enough to pack in lunchboxes without crumbling
The trick? Browned butter adds serious depth, sourdough discard brings tang, and one simple pressing technique keeps everything locked together.
And the best part is you get to decide what goes inside.
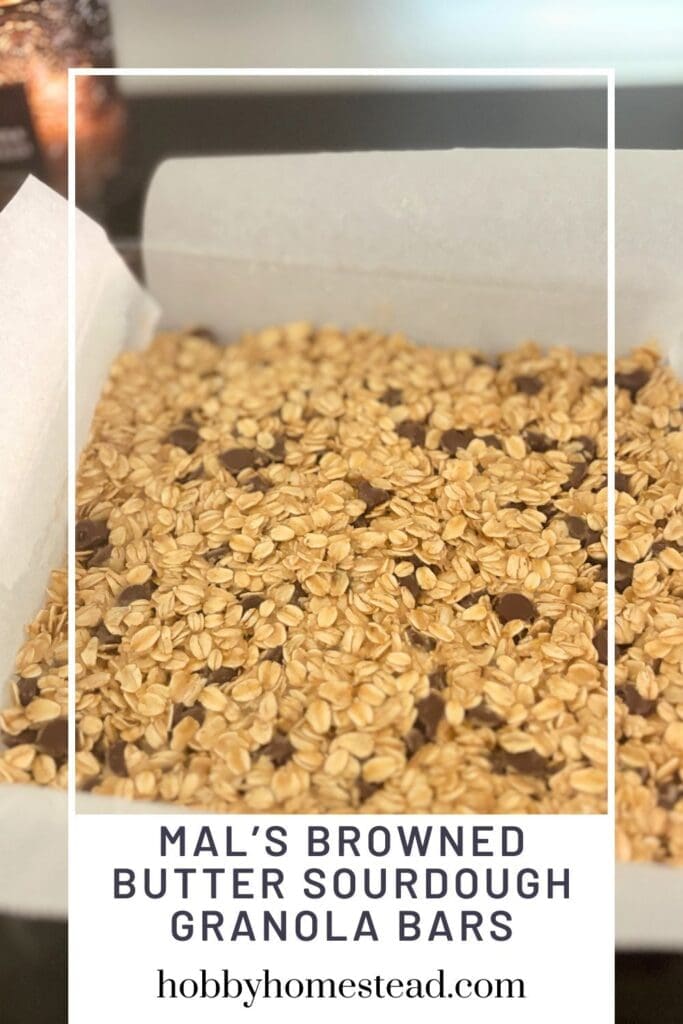
Mal’s Browned Butter Sourdough Granola Bars
As an Amazon Associate I earn from qualifying purchases.
Equipment

Ingredients
- ½ Cup Unsalted Butter browned, (113 grams)
- ⅓ Cup Sourdough Discard + 1 Tablespoon (100 grams)
- ¼ Cup Honey (85 grams)
- 2 Tablespoons Brown Sugar (30 grams)
- 1 Teaspoon Vanilla Extract (4 grams)
- 1¼ Teaspoons Salt (7 grams)
- 2¾ Cups Old-Fashioned Rolled Oats (240 grams)
- 1 Cup Chocolate Chips chopped nuts, dried fruit, or a combination
Instructions
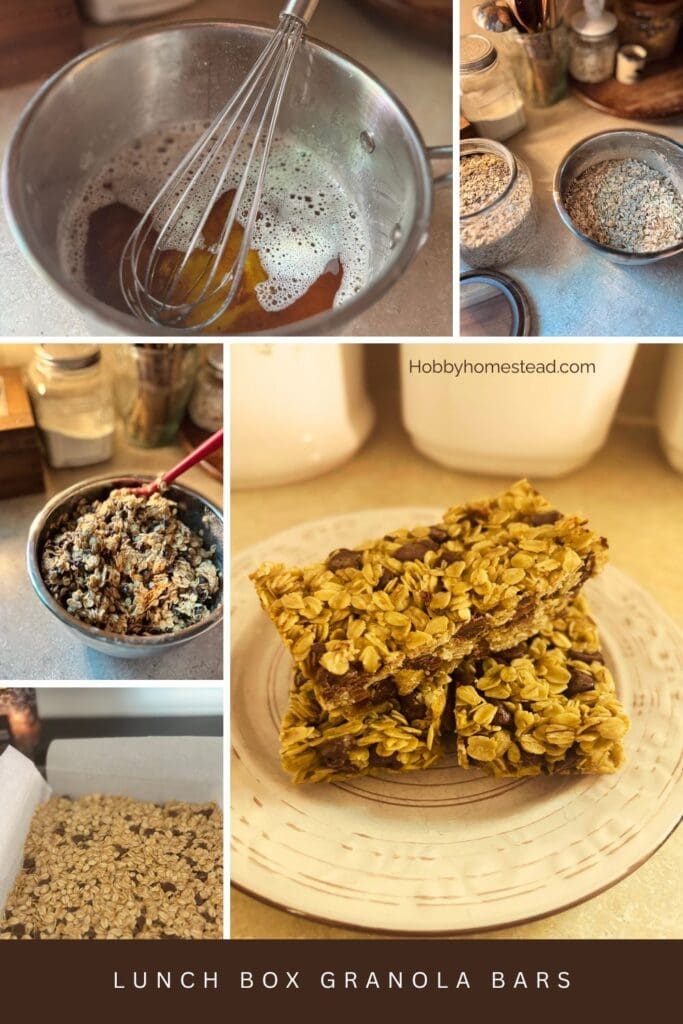
- The magic starts with butter that’s been pushed past golden into actual brown territory. Put half a cup of unsalted butter in a saucepan over medium heat. Let it melt completely, then keep going. You’re watching for two things: those little golden brown bits forming on the bottom of the pan and that unmistakable nutty, almost toasty smell that fills your kitchen. Stir occasionally with a whisk so you can see what’s happening at the bottom. The moment it smells like heaven and looks deeply amber, pull it off the heat. If those bits turn black, you’ve gone too far and the flavor turns bitter instead of rich.½ Cup Unsalted Butter
- While the butter cools slightly, preheat your oven to 325°F and line a 9 x 9-inch baking pan with parchment paper. Leave enough overhang on two sides so you can lift the whole block out later without wrestling with a spatula.
- Now grab a large mixing bowl and combine the browned butter with your sourdough discard, honey, brown sugar, vanilla extract, and salt. Whisk it until the discard fully dissolves into the mixture and everything looks smooth. This is where the sourdough tang gets distributed evenly, so don’t rush this step.⅓ Cup Sourdough Discard, ¼ Cup Honey, 2 Tablespoons Brown Sugar, 1 Teaspoon Vanilla Extract, 1¼ Teaspoons Salt
- Add your rolled oats and whatever mix-ins you’re using. Fold everything together with a silicone spatula until every oat is coated. The mixture should look sticky and clumpy, not dry.2¾ Cups Old-Fashioned Rolled Oats, 1 Cup Chocolate Chips
- Transfer the whole mess into your prepared pan. Use your spatula or another piece of parchment paper and press down firmly until the surface is completely even and compacted. The tighter you pack it now, the less it crumbles later when you’re trying to eat one in the car.
- Bake for about 25 minutes, just until the edges start turning lightly golden. The center might still look a little soft, and that’s fine. It firms up as it cools.
- Let the pan sit on the counter for 15 minutes, then move the whole thing to the fridge. The cold is what locks everything into place. Once it’s fully chilled and firm, lift it out using the parchment overhang and slice into bars.
Notes
Tips from our Kitchen
- Use a light-colored pan for browning butter. Dark pans hide the color change, and you’ll end up with burnt butter before you realize what happened. Stainless steel or light nonstick lets you see exactly when those milk solids hit peak toastiness.
- Weigh your oats instead of measuring by volume. Cups of oats can vary wildly depending on how packed they are. 240 grams gets you consistent results every time, and the bars hold together better when the oat-to-wet ratio is precise.
- Press the mixture while it’s still warm. Cold mixtures resist compression. If you press while everything is just warm enough to be pliable, you get a denser, more cohesive bar that won’t fall apart when you cut it.
- Chill before slicing, always. Room-temperature bars slice like a disaster. Cold bars slice clean with a sharp knife, and you can wipe the blade between cuts for bakery-level edges.
Nutrition
Variations & Swaps
The base recipe is a template, not a rulebook.
If you want these to taste like trail mix, use a combination of chopped almonds, dried cranberries, and dark chocolate chips. If you’re leaning into something more dessert-like, go all chocolate chips and a handful of toffee bits. Dried cherries and white chocolate give you a sweeter, fruitier vibe. Shredded coconut and chopped macadamia nuts turn these tropical.
You can also swap the honey for maple syrup if that’s what you have, though the flavor shifts slightly more caramel and less floral. Brown rice syrup works too and gives you a chewier texture overall.
If you’re out of sourdough discard, Greek yogurt or even mashed banana can step in, though you lose that signature tang. The discard adds a subtle complexity that makes people pause and try to figure out what they’re tasting.
For a nut-free version, use sunflower seeds and pumpkin seeds instead of chopped nuts. The texture stays crunchy, and you avoid allergen issues. If you want these grain-free, swap the oats for an equal weight of almond flour mixed with unsweetened coconut flakes, but expect a more crumbly, shortbread-like texture.
Play with spices too: a half teaspoon of cinnamon or cardamom in the wet mixture takes these in a warming, spiced direction that’s perfect for fall.
Storage Tips
These bars stay fresh at room temperature for up to five days if you store them in an airtight container with a piece of parchment between layers.
If your kitchen runs warm or humid, the fridge is a safer bet. They’ll keep for up to two weeks chilled, and honestly, they taste even better cold because the texture firms up and the flavors meld together. Just let them sit out for a few minutes before eating if you don’t like them straight from the fridge.
For longer storage, wrap individual bars tightly in plastic wrap, then stack them in a freezer-safe bag. They’ll last up to three months frozen. Thaw them overnight in the fridge or let them sit at room temperature for about 30 minutes. You can also eat them straight from the freezer if you like a firmer, almost frozen-treat texture.
Don’t reheat these. They’re meant to be eaten at room temp or cold, and warming them makes the texture go soft and weird.
Leftover Transformations
If you somehow have leftover bars sitting around, crumble them over yogurt for an instant parfait situation.
Break them into chunks and fold them into vanilla ice cream for a homemade mix-in that’s better than anything you’ll find at the store. You can also pulse them in a food processor until they’re coarse crumbs, then use that as a crunchy topping for baked apples or pears.
Crumbled bars also make a solid base for no-bake cheesecake cups. Press the crumbles into the bottom of small jars, top with a no-bake cheesecake filling, and you’ve got dessert that looks like you planned it all along.
If you’re feeling really extra, dip whole bars halfway into melted chocolate and let them set on parchment. Now they’re fancy enough to give as gifts, and no one needs to know how easy they actually were.
A Delicious Way to Use Sourdough Discard
These bars were born from the need to use up sourdough discard without making another batch of pancakes. They ended up being the kind of thing you keep in the fridge just because they’re there, not because you’re trying to be virtuous about snacks.
Make a batch, stash them in the fridge, and watch them disappear faster than you thought possible. That jar of discard guilt just turned into your new favorite excuse to bake.


A great option for breakfast on the go or a lunchbox treat.