
Welcome to a favorite kitchen labor of love: Mal’s Cold Ferment Sourdough Sandwich Bread. She is my niece and has become the sourdough whisperer. She has spent countless hours experimenting with her sourdough starter affectionately named Maple. Tweaking the measurements and fine-tuning her techniques to create the perfect slice.
After trial and error, this recipe has officially become her family’s number one favorite loaf, and we are so excited to finally share it with you.
Whether you are a seasoned baker or just starting your sourdough journey, these steps will guide you to a beautifully crunchy crust, soft, airy crumb inside, with that signature tang we all love.
A Weekly Routine
We keep a sourdough starter in a jar on the counter year-round.
It sits there, bubbling away, and every few days we feed it with flour and water. The thing about keeping a starter going is that it needs regular use or it gets sluggish.
We bake sandwich bread most weeks because it gives the starter purpose and gives us something we eat every day.

Why This Recipe Works
This is not a recipe that requires constant attention or perfect timing.
The stretch and fold method builds gluten without kneading, which means the dough develops structure while you go about your day.
You do a few quick folds over the course of a few hours, then let it rise slowly at room temperature. The long room temperature rise gives the yeast time to work, and the cold ferment in the fridge afterwards is what develops that deep sourdough flavor without making the bread too sour.
The cold also makes the dough easier to handle when it is time to shape and bake it.
Using a loaf pan instead of free form shaping gives you a predictable shape that fits in the toaster and makes even slices for sandwiches.
We are so excited to share Mal’s cherished recipe with you!

As an Amazon Associate I earn from qualifying purchases.
Equipment


Ingredients
- 500 Grams Bread Flour
- 350 Grams Water
- 100 Grams Sourdough Starter Active Risen
- 10 Grams Salt
Instructions
- Start by combining your active sourdough starter and water in a large mixing bowl.100 Grams Sourdough Starter, 350 Grams Water
- Use a wooden spoon to stir them together until the starter breaks up and the water looks cloudy. Add the bread flour and salt, then stir until it forms a shaggy dough.500 Grams Bread Flour, 10 Grams Salt
- Switch to your hand and squeeze the dough, pushing it between your fingers to work in any dry flour pockets. Mix for about five minutes until everything is incorporated and the dough feels cohesive. Keep a bowl of water nearby to wet your hands as needed. This makes the sticky dough much easier to handle.
- Cover the dough with a damp cotton towel and let it rest for about an hour. This rest period lets the flour hydrate fully and gives the gluten time to start developing on its own.
- Wet your hands and perform a stretch and fold. Pull one side of the dough up from underneath, stretch it gently away from the bowl, then fold it over the top of the dough. Rotate the bowl and repeat this motion all the way around the dough. Cover it again with the damp towel and repeat this process two or three more times, spacing them about 30 minutes apart. If you forget or run out of time, it is fine. The dough will still work. Some folds can be coil folds instead, where you lift the dough vertically out of the bowl with wet hands, let it stretch under its own weight, then quickly flip it back over itself. This builds tension in the dough and helps it hold its shape later.
- Let the dough rest in a warm spot in your kitchen for six to twelve hours. The exact time depends on how warm your house is and how active your starter was when you mixed the dough. The dough should roughly double in size, develop visible bubbles on the surface, and spring back slowly when you poke it with a wet finger.
- Turn the risen dough out onto a lightly floured counter. If you want to add inclusions like seeds or dried fruit, stretch the dough out flat, scatter the inclusions over the surface, then fold them in. Shape the dough into a loaf by folding the sides toward the center, then rolling it tightly from one end to the other. Use wet hands to keep the dough from sticking to your fingers.
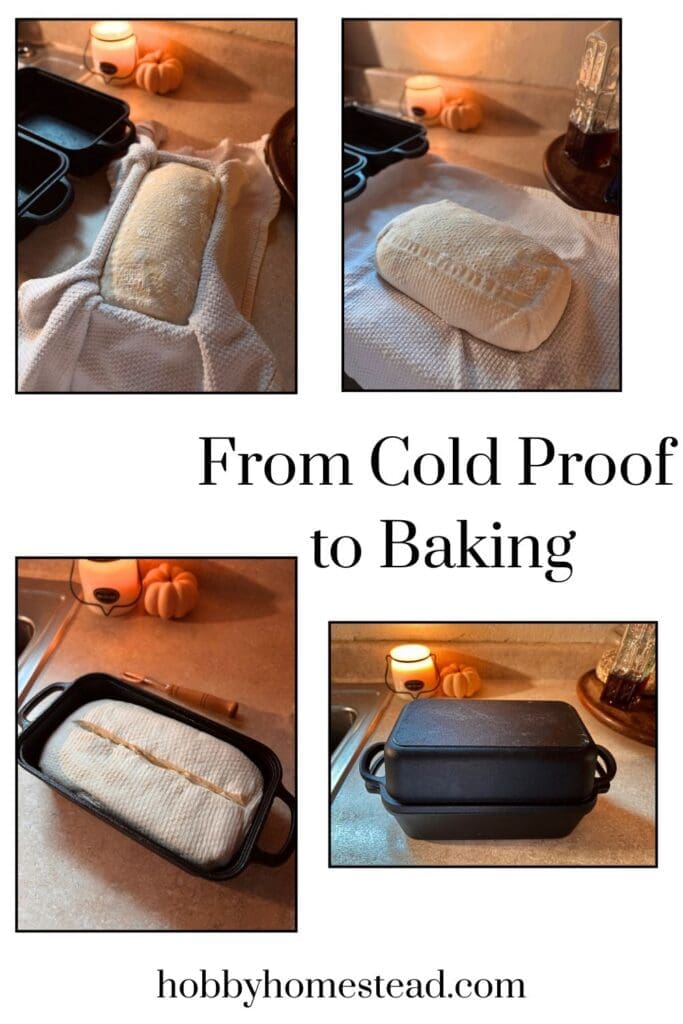
- Line a loaf pan with a floured cotton tea towel and place the shaped loaf inside. Pinch and fold the edges of the dough toward the center, working your way around the bottom until the seam is tightly closed. Mal calls this the “knitting” method.
- Fold the tea towel loosely over the top and place the pan in the fridge for 24 hours, up to three days. The longer it sits, the more pronounced the sourdough flavor becomes.
- When you are ready to bake, preheat the oven to 450 degrees. Grease a loaf pan well with butter or oil. Remove the loaf from the tea towel and place it seam side down in the greased pan. Score the top with a sharp knife or razor blade in one long line down the center to give the bread room to expand. Spray the top generously with water, then cover the pan with a second greased loaf pan set upside down on top, or with a piece of greased foil.
- Bake covered for 30 minutes. Remove the top pan or foil and bake for another 20 minutes until the crust is deep golden brown.
- Turn the loaf out onto a wire rack and let it cool for at least one hour before slicing. Cutting into it too soon will make the inside gummy.
- The process is long but not complicated, and most of the time is just waiting.
Notes
Active preparation: About 30 minutes, spread throughout the initial mixing and folding process
First rise: Approximately 6–12 hours, depending on your starter and kitchen temperature
Cold ferment: 24–72 hours
Bake time: Approximately 50 minutes
Cooling time: At least 1 hour
Equipment You’ll Need
You do not need special tools for this, just what most kitchens already have. You will need two loaf pans, one for the cold ferment and one for baking. Loaf pan for baking. A cast iron loaf pan with a lid works well for baking because it holds heat and creates a little steam, but any metal loaf pan will do the job if you cover it with foil. Loaf pan for refrigerator cold ferment Wooden spoon. A wooden spoon, a flat dough scraper for shaping Kitchen scale. A kitchen scale is the one thing that matters most because sourdough ratios work best by weight, not volume. Mixing bowl Measuring cups Flat bread scraper for shaping Two cotton tea towels round out the list. One towel stays damp to cover the dough while it rises, the other stays dry and floured for the cold ferment. Food grade water spray bottle filled with water. Bread lame or sharp knife. Used to score the loaf before baking. Cooling rack to cool the bread without the bottom getting soggy from the steam. Bread knife: easier and safer to cut sourdough withHow to Know the Sandwich Bread is Done
The crust will tell you most of what you need to know. When the bread is fully baked, the top and sides will be a deep golden brown, not pale or blonde. If you tap the bottom of the loaf with your knuckles, it should sound hollow. The internal temperature should register around 200 to 210 degrees if you want to be certain, but the color and sound are reliable enough once you have baked a few loaves. The crust will feel firm when you press it lightly, and the loaf will feel lighter than you expect when you pick it up because the moisture has baked out of the outer layers. If the top is browning too quickly during the final uncovered bake, tent it loosely with foil until the time is up.Nutrition
Mal’s Top Tips for the Perfect Loaf
To get that bakery-quality artisan finish at home, a few simple techniques make all the difference.
When it comes to baking, using a double cast iron loaf pan setup (like a Cast Iron Loaf Pan with a matching lid) is a total game-changer. Heavy cast iron ensures even heat distribution for a perfectly golden, crispy crust while locking in the essential steam needed for a dramatic oven spring.
Before your loaf ever hits the oven, though, proper handling is key. When shaping your dough, use a flat scraper and wet hands to build strong outer tension without tearing the surface.
Once you flip the dough upside down into your cotton tea towel-lined proofing pan, use the knitting method: gently pull the outer edges of the dough toward the center and pinch them together. This literally “knits” the bottom seam shut, trapping structure and ensuring your loaf expands upward rather than spreading outward.

Don’t rush the refrigerator cold proof
Letting the dough rest in the pan covered by the towel for 24 to 72 hours slows down yeast activity while allowing the lactic acid bacteria to work their magic. Resulting in a deeper, richer “sourdough” tang and a sturdy dough that is incredibly easy to score right before baking.
- Feed your starter at the same time every day so it stays predictable. A starter that doubles in four to six hours after feeding is ready to use. If it takes longer, it is not active enough yet and your dough will be slow to rise.
- Use water that is just slightly warm when you mix the dough, around 80 degrees. Cold water slows down fermentation too much, and hot water can damage the yeast.
- Grease the baking pan well or the loaf will stick when you try to turn it out. Butter works better than oil because it adds a little extra flavor to the crust.
- Let the bread cool completely before you slice it, even though it smells incredible when it comes out of the oven. The crumb is still setting as it cools, and cutting too early will flatten the texture.
These small details are what separate a loaf that works from one that does not.
How to Know Your Dough Is Ready
During the first rise, don’t rely on the clock alone. Look for a dough that has noticeably increased in size, has bubbles along the surface and sides of the bowl, and feels lighter and more elastic than when you first mixed it. A slow spring-back when gently pressed is another good indication that fermentation is progressing.
That would be very useful for Hobby Homestead readers, especially those who are newer to sourdough.
Troubleshooting Sourdough Sandwich Bread
Sourdough bread takes a little practice, and every kitchen is different. Temperature, starter activity, and fermentation time can all affect how your loaf turns out. Here are a few common issues and what you can do to help your next loaf turn out better.
Why Isn’t My Dough Rising?
If your dough hasn’t increased much in size after several hours, your starter may not be active enough, or your kitchen may be too cool. Sourdough rises at different rates depending on the temperature and the strength of your starter. Give the dough more time in a warm spot and look for an increase in volume and bubbles before moving on to shaping.
Why Is My Dough So Sticky?
Sourdough dough is naturally sticky, particularly when you first mix the ingredients. Keep a small bowl of water nearby and wet your hands before handling the dough. During shaping, a light dusting of flour on your work surface and a dough scraper can make the process easier. Try not to add too much extra flour, as it can change the texture of the finished bread.
Why Didn’t My Bread Rise Much in the Oven?
A loaf that doesn’t rise much during baking may not have fermented enough before shaping, or it may have fermented too long and lost some of its strength. Pay attention to how the dough looks and feels during the first rise rather than relying on time alone. When shaping, create a taut outer surface without tearing the dough, and keep the seam tightly pinched together.

Why Is My Sourdough Bread Gummy Inside?
A gummy center can happen when bread hasn’t baked long enough or is sliced before it has cooled completely. Bake until the crust is deep golden brown and the center reaches approximately 200–210°F. After baking, transfer the loaf to a wire rack and let it cool for at least one hour before slicing. This gives the crumb time to finish setting.
Why Is My Crust Too Dark?
If the crust is browning too quickly during the uncovered portion of baking, loosely tent the loaf with foil and continue baking until it is done. Oven temperatures can vary, so keep an eye on the bread during the final 20 minutes. You want a deep golden-brown crust and a fully baked center.
Variations & Swaps
This recipe is flexible enough to handle changes without falling apart.
Swap half the bread flour for whole wheat flour if you want a heartier loaf with more texture, but add another 10 to 20 grams of water because whole wheat absorbs more liquid.
You can replace up to 100 grams of the bread flour with rye flour for a slightly denser crumb and a deeper, earthier flavor.
If you want to add seeds, dried herbs, or grated cheese, fold them in during the shaping step and keep the total weight of additions under 100 grams so the dough structure does not collapse.
For a sweeter loaf that works well for toast, add 20 grams of honey when you mix the dough with the water and starter.
You can also bake this dough as rolls instead of a loaf by dividing it into eight pieces, shaping each one into a tight ball, and baking them in a greased muffin tin for 20 to 25 minutes at 425 degrees.
The basic method stays the same no matter what you add or change.
Storage Tips
This bread keeps well if you treat it right.
Let the loaf cool completely, then store it in a cotton bread bag or wrap it loosely in a clean tea towel.
It will stay soft at room temperature for up to five days.
Do not store it in plastic or an airtight container because the crust will get soft and the loaf will start to taste stale faster.
If you want to freeze it, slice the loaf first, then stack the slices with a small piece of parchment between each one. Wrap the whole stack tightly in foil, then slide it into a freezer bag.
Frozen slices can go straight into the toaster from the freezer.
To refresh a loaf that has started to firm up, wrap it in foil and warm it in a 300 degree oven for 10 to 15 minutes. The crust will soften slightly, but the inside will taste fresh again.

Mal’s Sourdough Sandwich Bread is Reliable
This is the loaf Mal keeps coming back to, and after all the experimenting she has done, it has earned its place as her family’s favorite sandwich bread. It takes a little planning, but most of the work is simply letting the dough do its thing. For us, that makes it a sourdough recipe worth keeping in the weekly rotation.
It is simple in the way that reliable things tend to be, and it fits into how we already cook and eat.
Stay connected with Hobby Homestead
Add Hobby Homestead as a preferred source in Google Search to make it easier to find our articles when you're searching for recipes, gardening tips, preserving ideas, and more.



My family loved this!