Growing potatoes in containers is one of the easiest ways to enjoy a homegrown potato crop, especially if you have small gardens, live in colder climates, or simply want to avoid weeds and soil-borne diseases. With the right techniques and a suitable container, you’ll enjoy higher yields of delicious new potatoes right from your patio or balcony.
Whether you’re planting in 5-gallon buckets, grow bags, plastic storage tubs, or even trash cans, this step-by-step guide will walk you through the best way to grow container potatoes with great results.

Table of contents
Why Grow Potatoes in Containers?
- Ideal for small spaces and urban gardeners
- Helps prevent potato blight and control pests like the Colorado potato beetle
- Better drainage and fewer weed seeds
- Easier to harvest potatoes. Just dump the container!
- Extend the growing season in colder climates
What You’ll Need
- Large container with drainage holes (minimum 10–15 gallons of soil volume)
- Certified disease-free seed potatoes (avoid grocery store potatoes)
- Quality potting soil or soil mix with organic matter, peat moss, and loose soil
- Full access to sunlight (6–8 hours per day)
- Optional: straw or mulch for moisture control
Step-by-Step: How to Plant Potatoes in Containers
1. Choose Your Potato Varieties
Select a type of potato suited to container growing:
- Yukon Gold. Early to mid-season, smooth texture
- Red Pontiac. Great for new potatoes
- Second earlies. Good for mid-season harvests
- Determinate varieties. Perfect for smaller containers
- Indeterminate potatoes. Grow taller and need more soil
Avoid using grocery store potatoes, which might carry disease or not sprout due to anti-sprouting chemicals.
2. Prepare the Container
Pick a black container, garbage bin, potato pot, or grow bag with enough depth (16–18 inches). The size of the container matters. Larger ones hold more soil and yield lots of potatoes. Drill or check for drainage holes at the bottom of the container or bottom of the bucket to avoid excess water.
3. Add Soil and Seed Potatoes
- Add 4–6 inches of soil to the bottom of the pot.
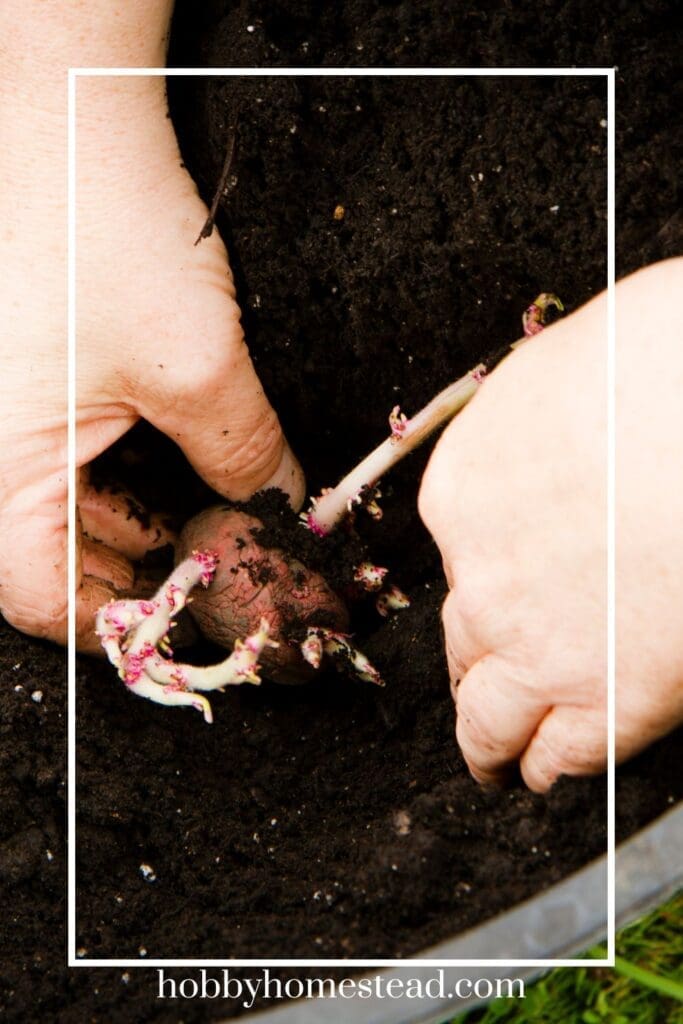
- Cut large seed potatoes into smaller pieces, making sure each has at least one potato eye.
- Place pieces in a single layer, eyes facing up.
- Cover with 3–4 inches of loose soil.
Rule of thumb: 2–4 seed potatoes per 5-gallon bucket, depending on the size of the container.
4. Water and Care
- Water regularly but don’t overdo it. Too much moisture can cause potato blight or rot.
- Keep in a cool place until the new plants sprout, then move to full sun.
- Add soil every couple of weeks as the stem of the plant grows, leaving the top few leaves exposed. This encourages tubers to grow up the soil surface.
5. Watch for Pests and Weather
- Monitor for the Colorado potato beetle. Remove them by hand.
- In cold climates, protect from frost damage with row covers or by moving containers indoors during late frosts.
- Choose early varieties for a head start, especially if planting in early spring.
Ideal Soil Temperature for Planting Potatoes
Timing is everything when it comes to planting potatoes. And soil temperature is one of the most important factors for success.
Potatoes are a cool-season crop, which means they grow best in cool but not cold conditions. For the best results, plant your seed potatoes when the soil temperature is consistently around:
🌡️ 45°F to 50°F (7°C to 10°C)
This is warm enough for sprouts to develop but still cool enough to avoid early-season diseases. If the soil is colder than 45°F, your potatoes may rot before sprouting. If it’s too warm, they may sprout unevenly or struggle with stress.
Use a simple soil thermometer to check conditions in your container, especially in early spring. Containers can warm up faster than garden beds. Especially black containers or pots placed in full sun. So they’re a great way to get a head start in colder regions.
✅ Tip: If you’re not sure when to plant, use your zip code to find your area’s average last frost date, and plant 2–4 weeks before that. As long as the soil is warm enough.
Choosing the Right Container for Growing Potatoes
Not all containers are created equal when it comes to growing potatoes. The most important rule is to pick a container that holds enough soil, has good drainage, and can hold up through the entire growing season. From early spring to late summer or fall harvest.
✅ Qualities of a Good Potato Container
- Minimum 10–15 gallons of soil volume
- At least 16 inches deep
- Strong enough to hold wet soil
- Has drainage holes to prevent excess water
- Can withstand rain, sun, and the weight of the growing plant
Recommended Containers for Potatoes
Here are some tried-and-true container options that work well for container-grown potatoes:
🪣 5-Gallon Buckets
- Inexpensive and readily available
- Drill 4–6 drainage holes in the bottom of the bucket
- Easy to move around
- Holds 2–3 certified seed potatoes
🛢️ Trash Cans and Garbage Bins
- Great for larger potato crops
- Choose plastic or metal (not cardboard!)
- Drill holes in the bottom of the container and lower sides for drainage
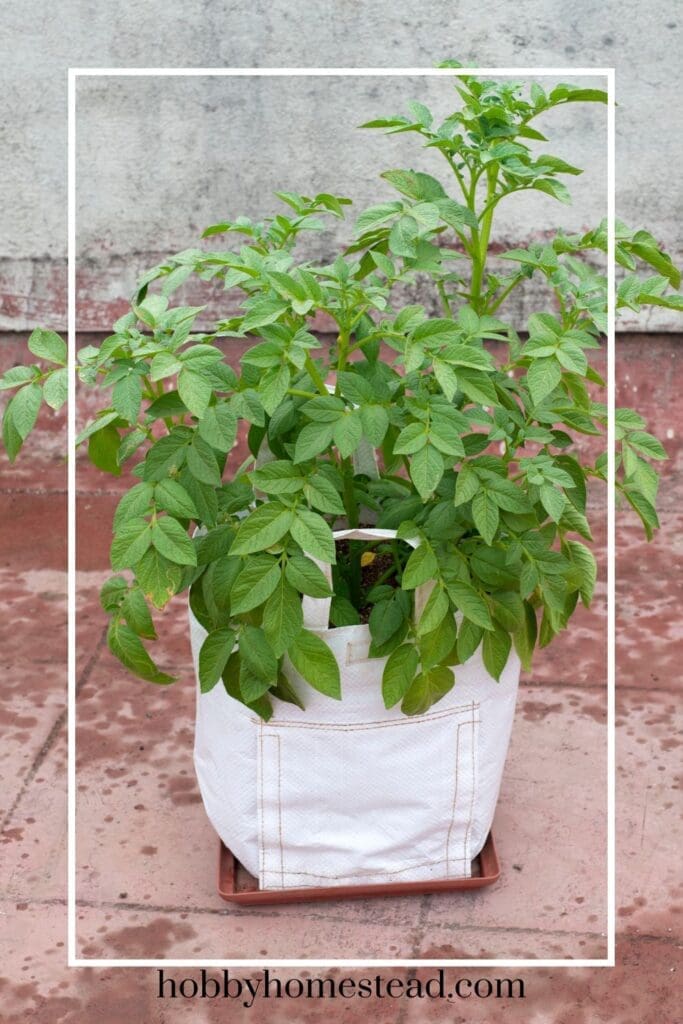
🧺 Grow Bags
- Made of breathable fabric for better airflow and drainage
- Some come with side flaps to check on potatoes
- Lightweight and foldable for storage
- Available in various sizes (10–30 gallons)
🪟 Plastic Storage Tubs
- Large surface area and good depth
- Make sure to drill several drainage holes
- Great for determinate varieties that grow in layers
🪵 Wooden Boxes or Crates (lined)
- Can work well if lined with landscape fabric
- Must be raised off the ground for proper drainage
- Long-lasting if made from untreated wood
Containers to Avoid
🚫 Cardboard Boxes
Like your daughter discovered, cardboard breaks down fast once exposed to water and soil. While it might look like a clever zero-waste hack on TikTok, cardboard can’t handle the moisture and weight over time. It’s a good idea to skip this one unless you’re only growing for a few weeks or using it as an inner liner inside a stronger container.
🚫 Containers Without Drainage
No matter how pretty or large a container is, if it doesn’t have drainage holes, water will collect and rot your potato pieces. Always ensure excess water can escape.
How to Prepare Your Potato Container
Before planting, here’s how to get your container potato-ready:
1. Add Drainage Holes
- Drill at least 4–8 holes in the bottom of the pot, depending on size.
- For extra drainage, add a few holes an inch or two up the sides.
- Consider placing small rocks or gravel at the bottom for extra drainage (optional but helpful).
2. Position the Container
- Place it in full sun. Potatoes love light!
- Set containers on bricks, plant stands, or wooden slats to help drain water and prevent rot.
3. Add Soil Mix
- Start with 4–6 inches of potting soil, enriched with organic matter like compost.
- Avoid garden soil or topsoil, which compacts and contains weed seeds.
- For best results, mix in peat moss for moisture retention and aeration.
- You can also buy pre-mixed potato soil blends from garden centers.
4. Plant Seed Potatoes
- Lay seed potatoes or smaller pieces with potato eyes facing up.
- Cover with 3–4 inches of loose soil.
- As plants grow, add more soil every couple of weeks until you reach the top of the container.
What Is a Seed Potato?
A seed potato is simply a potato used for planting, not eating. It’s not a seed in the traditional sense. Instead, it’s a piece of potato (often a whole small one or part of a larger one) that contains one or more “eyes”, the dimples on the potato surface where new sprouts form.
These eyes are what grow into the stems, leaves, and tubers of a new potato plant.
Certified Seed Potatoes vs Grocery Store Potatoes
✅ Certified Seed Potatoes
- Sold specifically for planting
- Guaranteed to be disease-free
- Often found at garden centers in early spring
- Come in a variety of potato types: Yukon Gold, Red Pontiac, fingerlings, and more
Best choice for healthy, productive plants and maximum yield.
⚠️ Grocery Store Potatoes
- Often treated with sprout inhibitors to prolong shelf life
- May carry diseases like potato blight
- Not guaranteed to be certified disease-free
- Only use if they’re organic or untreated, and you’re willing to take a small risk
Grocery store potatoes can work for a first attempt or casual experiment, but certified seed potatoes are a better choice for consistent results.
How to Prepare Seed Potatoes for Planting
Whether you’re using certified seed potatoes or those sprouting in your pantry, preparation is key.
🥔 Step 1: Check the Potato
- Make sure it’s firm and healthy, without signs of rot or mold
- Look for visible eyes or small sprouts forming
🔪 Step 2: Cut into Pieces (if needed)
- Large potatoes can be cut into smaller pieces (about the size of an egg)
- Each piece must have at least one or two eyes
- Let cut pieces air dry for 1–3 days before planting—this helps form a protective callus over the cut surface and prevents rot
Rule of thumb. Use whole small potatoes and cut up large seed potatoes
🌱 Step 3: Pre-Sprout (Optional but Helpful)
This is called chitting. If you want a head start, place your seed potatoes in a cool place with indirect light (like an egg carton on a windowsill) for a couple of weeks before planting.
You’ll see stubby green or purple sprouts start to form from the eyes.
Using Sprouted Pantry Potatoes
If you find potatoes in your pantry that have long, pale sprouts, they might still be usable for planting. Here’s how to decide:
✅ Can Be Used If:
- The potato is firm, not mushy or moldy
- Sprouts are healthy-looking (greenish, purplish)
- You know the variety or at least know it’s an untreated organic potato
❌ Avoid If:
- The potato is soft, wrinkled, or rotten
- The sprouts are long and white but floppy or brittle
- You’re planting in an area where potato blight is a concern
How to Plant Pantry Sprouts
- Gently break or cut into plantable pieces, as with seed potatoes.
- Handle sprouts carefully, they’re delicate.
- Plant in well-drained soil with the eyes/sprouts facing up.
- Follow normal soil layering to encourage tuber growth.
Seed Potato Summary
- Seed potatoes are the foundation of your potato crop. Start with healthy, viable ones.
- For best results, always go with certified disease-free seed potatoes.
- Sprouting pantry potatoes are a fun way to experiment but may not give the best potatoes or highest yields.
- Whether from a store or your own kitchen, preparing the potato correctly will make or break your container potato garden.
What Is Soil Layering in Potato Containers?
Soil layering refers to adding soil in stages as your potato plants grow. Instead of filling the container all the way at the start, you only begin with a few inches of soil.
As the plant grows taller, you continue adding more soil around the stem. Kind of like hilling potatoes in the garden.
This process mimics how indeterminate potatoes (the kind that grow tubers along their stems) naturally produce more potatoes when they’re covered with soil over time.
Why It Matters
- Encourages the stem to produce more tubers, leading to higher yields.
- Keeps developing potatoes out of sunlight (which can turn them green and toxic).
- Maintains steady moisture and protects roots from temperature swings.
- Helps support tall potato plants so they don’t fall over.
Step-by-Step: How to Layer Soil in a Potato Container
🪴 Step 1: Start with a Base Layer
- Add 4–6 inches of loose soil to the bottom of the container.
- Place seed potatoes or potato pieces with eyes facing up in a single layer.
- Cover with 3–4 inches of soil—just enough to fully bury them.
🌱 Step 2: Let the Plants Grow
- Wait until your potato plants grow to about 6–8 inches tall.
🌾 Step 3: Add Another Soil Layer
- Add another 3–4 inches of soil, covering the bottom part of the plant while leaving the top few inches and leaves exposed.
- You can also mix in straw or peat moss with the soil for better drainage and moisture retention.
🔁 Step 4: Repeat as Needed
- Continue this process every couple of weeks as the plant grows.
- Stop adding soil once you’re about 2 inches below the top of the container.
- This is typically done 3–4 times during the growing season.
Pro Tips for Best Results
- Use indeterminate potatoes like Yukon Gold or Red Pontiac, which produce along the stem.
- Don’t cover the entire plant. Leave the top of the plant and some leaves exposed so it can photosynthesize.
- Keep soil light and loose (not compacted), so tubers can expand easily.
- Be gentle when adding soil. You don’t want to break or damage the tender stems.
What Kind of Soil Works Best?
- A blend of potting soil, compost, peat moss, and organic matter.
- Avoid heavy garden soil or clay-based soils in containers.
- Look for soil that is well-drained, light, and rich in nutrients.
- Some container gardeners also layer in a small amount of slow-release fertilizer or worm castings as they build up the soil.
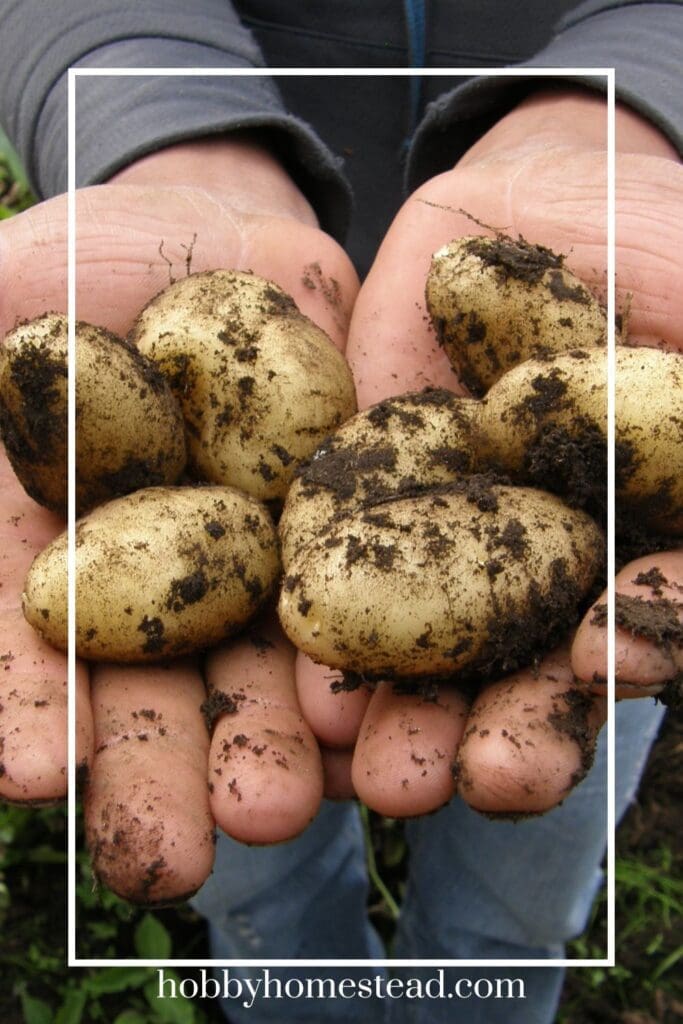
Harvesting Your Container Potatoes
- Early potatoes are usually ready 60–80 days after planting.
- For late season or fall harvest, wait until the leaves yellow and die back in late summer.
- For the easiest way to harvest, dump the container onto a tarp and gather your new potatoes by hand.
- Small potatoes will be ready first, while larger ones continue to grow.
How to Store Your Harvested Potatoes
Once harvest time arrives and you’ve dug up your container-grown potatoes, it’s important to store them properly so they stay fresh as long as possible.
Start by brushing off any loose soil. But don’t wash them yet.
Let the potatoes cure for about 7–10 days in a cool, dark, and well-ventilated place (like a garage or shed). This toughens their skin and helps them last longer in storage.
After curing, place your potatoes in a cardboard box, paper bag, or a basket lined with newspaper.
Store them in a cool place (ideally around 40–50°F) with low light and good air circulation. Avoid storing near onions or apples, which can cause sprouting.
Skip the fridge. Cold, humid air can alter the flavor and turn starch into sugar.
For now, that’s all you need to keep your harvest in great shape.
Tips for the Best Results
- Don’t use garden soil in containers. It compacts easily and might contain weed seeds or pathogens.
- Use certified seed potatoes from garden centers for best health and productivity.
- Choose containers with good drainage and elevate them off the ground to let excess water escape.
- Keep an eye on your zip code’s average frost dates for correct planting times.
- Rotate where you place containers each year to avoid potato diseases.
Space-Saving Potatoes in Containers
Container-grown potatoes are a good choice for container gardeners looking to maximize yield in small spaces. Whether it’s your first attempt or a repeat from last year, growing potatoes in containers is a fun, satisfying way to enjoy homegrown food with minimal space and effort.

